Posts tagged Mac
Add "Mac" Dock to Windows

If you like the dock feature Mac OS X has, you might be interested in StarDock ObjectDock. They offer a "plus" version, but  I think the free version is good enough. I used it for a while, it gets the job done nicely. On the other hand, I use Windows 7,  and I found it to be overkill specially since Windows 7 allows you to pin icons, essentially, a static dock.  I recommend it to anyone who does NOT have Windows 7 in their machine or does not like the pinned icons.  Compared to the Mac OS X dock, it does NOT have stacks within the dock. A small set back, but not really essential to its overall functionality.


[caption id="" align="aligncenter" width="485" caption="courtesy Google images"][/caption]

Installation is simple. Simply download and install. It has relatively non-technical options to configure . The only option that is maybe a little tricky is the  "optimize for performance or memory."  Windows 7 and Vista need about 1GB RAM to start off, so if you have less than 2GB, I would recommend optimize for performance. Windows XP is less demanding, but if you have 512MB or less, definitely optimize for performance!  Of course, you can always experiment with the setting!

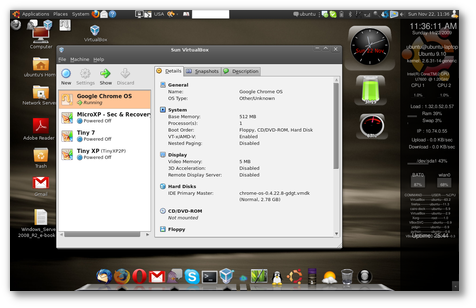
But if you need another reason to switch to Linux, there is a project called Cairo-Dock which, in my opinion runs circles around the Mac OS X.  Above is a screenshot, but if someone wants more information on Cairo-Dock, please let me know!
App Cleaner for your Mac

image Mac's popularity is rising because numerous number of people are leaving  Windows to the simplistic way, Apple. Many are used to the add/remove program's feature in Windows but in Mac, to uninstall, you simply drag it to the trash. In some ways, I find that it is not enough. Especially on Ant-Viruses and other deep level apps. Lucky,there is an awesome application remover called appcleaner. This application removes all scattered files pertaining to that specific application. Good luck and enjoy it; the Apple way.

Mac OS X's Exposé & Spaces

Some of Mac's handiest features are its Spaces and Exposé functions but not enough people know about them. Especially Exposé when it's used with Mac's Active Screen Corners (ACS). For those that don't know what any of this means, Exposé is a window management tool that displays all the open windows on the screen and Spaces is a virtual desktop manager. Spaces is a great way to keep yourself organized. For example, I usually have it set to 4 virtual desktops. I have one for my media (music and movies), one for browsing, one for tasks in the Finder, and another for my schoolwork.

Now Exposé is a little different but just as handy. Exposé was made for those that get over-whelmed with all the open windows and can't find what they're looking for. All one has to do is press a button on their keyboard or click on an icon on the Dock and all the open windows, or all the windows for the active application, will be displayed. But there is one more way to activate Exposé and that's through the Active Screen Corners.

ACS works by moving your mouse toward any of the 4 corners of your screen. It has to be exactly on the corner for it to be activated. First, if you've never heard of ACS, then you probably don't have any active corners yet. Go into the System Preferences, choose the Exposé & Spaces on the top row, and you will be greeted with a picture of a desktop with options on each corner. Here you can choose what each corner can do. It can display all the open windows, all of the open windows for the active application, hide all the windows and display the desktop, display all of the virtual desktops in Spaces, and many other actions.

The combination of Exposé and Spaces with the Active Screen Corner's can be a great organizational help when it's used properly. Don't just stop with Exposé & Spaces. Look through your Mac's preferences and see what else you can tinker with.

Don't Delete Your Apps, Unistall Them.

Soon after I switched from a PC to a Mac, I was taught that the way to uninstall an application was to simply delete it and empty the Trash. It wasn't after finding some leftover folders and files leftover on my harddrive that I decided to find a better way to uninstall the app. There are some well known version like AppDelete and AppZapper, I have been using the free alternative AppCleaner. While the names aren't that creative, they make up for it by the usefulness of the application. What it does is search your harddrive for similar files to the app you want to delete and then you get to choose which ones go away. Great way to make sure the app didn't leave any unnecessary files or I can be able to do a clean install again. You can get AppCleaner here.

Difficulty Level: Easy

Firefox 4 Beta Released

The first beta build for Mozilla's browser, Firefox 4, was just released today with a variety of changes. First and foremost, check to make sure your crucial add-ons are currently compatible with the latest build. In this case, that would be beta1. If all is still well, then install and prepare for the changes (only two of them). The first difference is that tabs are now on top of the window, similar to the layout the beta release for Safari 4 used. If you weren't a fan of them, there is an option for you to return them to their familiar home.

The second is the introduction to the "Firefox button". Instead of a menu bar, you get a button. If you've ever used an app from Microsoft Office, then you know what I'm talking about. Just like the tab change, there's an option for the menu bar to return (which I will be doing).

For now, these changes will only be available for those that use it on Windows but will later be available for Mac and Linux users. You can get the beta here.

Finding duplicates songs in itunes

In iTunes, a very useful feature is Finding duplicate songs in itunes. Many of us have GBs of songs. If you just go to File -> Show Duplicates menu item. You can use this feature to help find all duplicates from your library. However, we have different versions of songs. To find the 'Exact Duplicate' hold down shift in Windows and the option key in Mac and go to File ->Show Exact Duplicates. With this button iTunes shows only true duplicates, and not other versions.

Sync your Blackberry to your Mac. Finally!

[caption id="attachment_892" align="alignnone" width="459" caption="RIM's Desktop Manager"][/caption] This tip is for those Blackberry owners with their only computer being a Mac. This past October ('09), RIM finally released their desktop manager for Macs. Before, the way to upgrade your phone's firmware was to use the PC's client. It was very difficult for users to upgrade their phone's software that didn't a PC so they were stuck using the old firmware. And believe me, the upgrades are a giant leap in usability. The latest updates improved the internet browser, media player, and overall stability.

The desktop manager not only upgrades the phone's firmware but you can also sync your contacts, calendar schedule, tasks, media, and most importantly backup your phone. No more asking people for their phone numbers. Instead when you get a new phone you can just connect it to your mac and choose to sync the contacts from your Mac to your phone.

The iTunes integration is solid with options to sync specific Playlists or just add random music to the remaining space on your media card.

You can get the desktop manager here from RIM's site.

System Requirements:
At least Mac OS X 10.5.5
Your Blackberry's firmware needs to be at least 4.2
(You can check your version by pressing Alt+ Left Shift + H on your phone and look up the App Version. For example mine says App Version: 5.0.0.328 (508))
Difficulty Level: Easy
Turn Your Mac Into a Wi-Fi Adapter for Your Xbox 360

Halo: ReachThis one goes out to all you Mac and Xbox 360 users. Every Friday or Saturday, friends and I would hold our usual LAN parties. It would mostly consist of Warcraft III, Starcraft II, and some D&D every once in a while. But this past Friday (4/30), an extra special game was added to the list. How special? Halo: Reach special.

I was able to get a "Friends & Family" beta key so I took my 360 to the LAN party and started getting it set up. Everything was ready to go except for one problem, there was no network cable available that was long enough to connect the 360 to the router. Luckily, I had my MacBook Pro with me and used that as a Wi-Fi adapter for the 360. At my house, my router is too far for any network cable to reach my 360 so I've been using my MBP for a while now. After the jump, check out the video that I used to connect my 360 and possibly a quick impression on Reach.

Difficulty level: Easy

The only requirements for is a Mac, Xbox 360, and the network cable that came with the 360. If for whatever reason you don't have it, any Cat5 cable should work.

[youtube=http://www.youtube.com/watch?v=WV4qd1RHmH8]

I have tried this personally and confirm that it works. This is only for Macs but there are other videos and guides for PC owners. The process should be similar. If you know a video or guide for PCs and have tried it yourself, drop a link in the comments.

----------------------------------------

As far as Halo: Reach is concerned, it is the best Halo game that I have ever played. (Disclaimer: I never played ODST.) I've only played for a couple of days but those days have been very entertaining. The biggest additions are the Armor Abilities and Loadouts. The Amor Abilities addition expands the equipment from Halo 3 for some variety and action. There's the Jetpack, Active Camo, Armor Lock, Sprint, and Evade. Loadouts are combinations of Armor Abilities and equipment. You can choose before in the pre-game lobby but also when you're about to spawn. So whenever you get tired or a certain ability or loadout, you can choose something else when you die and spawn. Visually, it's a great improvement over Halo 3. The Assault Rifle in Reach used more polygons than a whole marine in Halo 3. Overall, it's been a lot of fun and cannot wait for the retail version in the fall.

Check out Bungie's beta guide to check out all that Reach has to offer. And remember, the beta opens up to ODST owners in the late morning tomorrow. Enjoy.